

Anchoring and Mooring
Nautical knots
The ability to select the correct knot for a particular purpose and to be able to tie it in a variety of situations and with different materials is an essential skill for any sailor.
Unfortunately many people are not prepared to take the time to learn to tie knots correctly which results in a lot of wasted time and inconvenience that could easily have been avoided.
The best approach to learning to tie knots is a little and often. Ten minutes a day for a month is all it takes.
A good knot is one that stays done up, is easy to undo when required and does not weaken or damage the rope.
The knots in the RYA syllabus are:
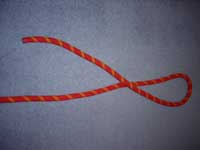
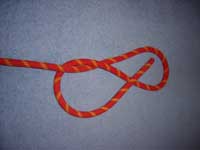
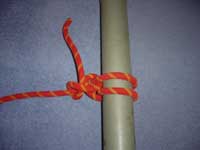
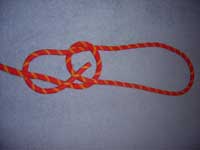
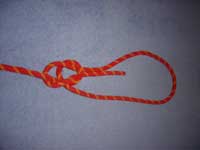
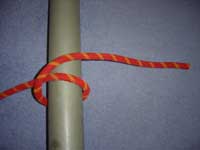
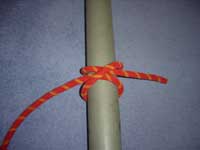
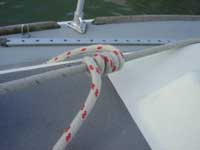
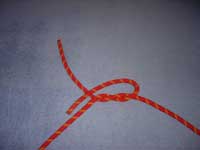
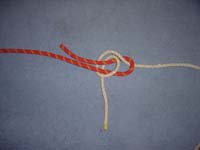
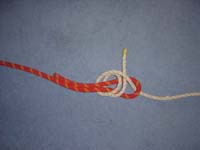
Figure 8
This is a "stopper" knot, essential it makes a lump on the end of the rope that will not pull through a fairlead or other fitting. Virtually all ropes (halyards and sheets) in the cockpit of a sailing boat should have a stopper knot in the end to prevent them being pulled through too far and becoming unreachable.

The exception to this is ropes attached to a spinnaker, in rare circumstances it may be necessary to release a spinnaker completely by letting the ropes run free.
The figure of 8 knot should be tied near the end of the rope but with at least a 40cm tail, this is to reduce the risk of the end of the rope pulling through the knot and becoming undone.
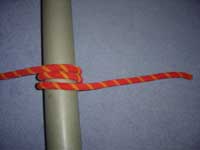
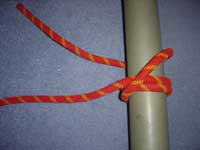
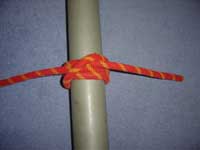
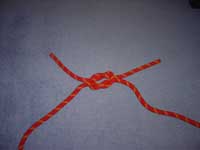
Round turn and two half hitches
This knot is one of the most important as many jobs on a yacht can be done safely by using a round turn and two half hitches (even when it is not the recommended knot). It is a knot that can be tied when there is some tension on the rope and provided the load is not too great can also be released when loaded.
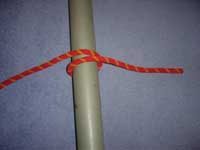

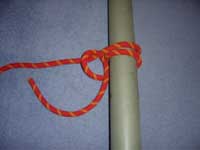
Again the tail of the rope should be fairly long, especially if this knot is used to tie a boat up. The jerks caused by the boat's motion can cause the end of the rope to gradually work through the knot, thus causing it to release.
Bowline
Probably the hardest knot to learn, it is the real measure of how well people have learnt their rope handling. The bowline gives a fixed loop in a rope but one that can be fairly easily adjusted for size.
However, it is impossible to release under load. For this reason it should be treated with 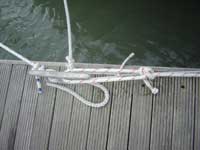 caution in some situations. Mooring ropes are often tied to the yacht's cleats with a bowline, the danger is that if the rope is then loaded, as can happen if the rope snags a cleat on the pontoon as you depart, it can not be released without removing the load-or cutting the rope.
Something else that happens when a Bowline is used for mooring is that the rope is able to move slightly on the cleat or the ring on the mooring buoy, when this happens in gusty conditions or in a strong tide the rope can gradually cutthrough and may snap in time. It is advisable to pass the rope right around the cleat and put a round turn in the middle of the knot in a similar manner to a start of a round turn and two half hitches.
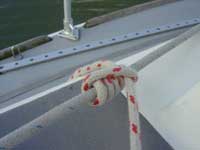
Clove hitch
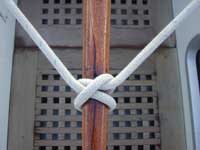
A very useful knot that is easy to misuse. The best use for a clove hitch is when both end of the rope have an even load, such as for lashing the tiller in the middle of the boat. If it is used in situations where the load is only on one end of the rope, there is a tendency for the rope to slowly pull through the knot until it releases.
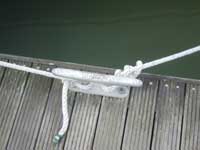
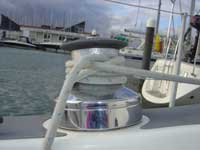
Fenders are frequently tied to the guard rail with a clove hitch, whilst this is fine for a short 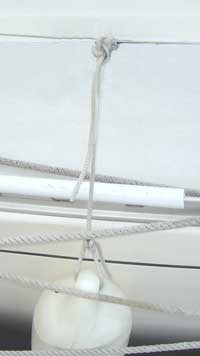
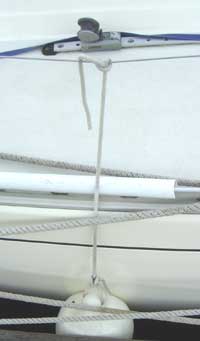 period, I would recommend that once the boat is finally moored, the fenders should be re-fastened with a round turn and two half hitches.
If they are left tied with clove hitches and the boat is pushed hard against the quay by the wind, the rope will slowly slide through the knot and the fender will fall off or be positioned too low to be useful. This is beginning to happen on the boat in the example on the left.
This is the main reason people lose fenders overnight in marinas.
It is also easy for a novice to tie a clove hitch incorrectly, when this happens the fender will often fall off.
Rolling hitch
The rolling hitch is not often required, but when it is there is not really another knot that will do the trick. This knot should allow you to pull along the length of another rope (especially one that is under load) or a wooden pole.
The classic use is to take the load off a sheet when a riding turn has been wound on to a winch, this is something that all sailors should have practiced at some time.
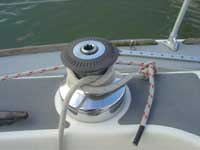
You will almost certainly find that the normal rolling hitch where the rope is passed twice round the loaded rope does not work. It is normally necessary to pass the rope around the loaded one 4 or 5 times to achieve sufficient grip.
To use this technique there needs to be another winch that is available to use to pull back on the rolling hitch with sufficient force to release the load on the riding turn. If you do not have another winch available, try releasing the halyard to the sail, this should take the load off the sheet which has the riding turn.
Reef knot
The correct use for a reef knot is to joint two ropes of equal size, normally the two ends of the the same rope. As few boat have reef points anymore it is rarely required, even when using a lashing a sail to the boom or guardrail most ties used today have a fixed loop in one end or are tied in a bow in a similar manner to tying shoe laces.
However it is still a knot that you will require occasionally.
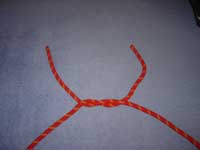
Sheet bend
When two ropes are of different dimensions they should be joined by a sheet bend. The thicker rope is always the one that is bent in two and the thin one is passed around it.


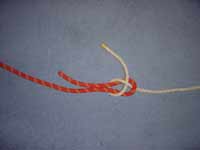
To be strictly correct the short ends of the two ropes should be on same side of the knot when it is completed.
Double sheet bend
The single sheet bend is not very secure, I would always recommend that a double one be used. For the double knot the thinner rope is passed around the thicker twice before being finished off. In fact, there is nothing to stop you going round three or four times if you wish.
When mooring on piles it is normally necessary to join ropes until they are long enough to pass all the way round the piles and back. It this is done with a sheet bend it is not unusual for the knot to release as soon as it falls in to the water, this knot works best if it is kept under tension.
You may choose to join two ropes by tying two bowlines together, the problem with this is that if they are loaded heavily they will cut through each other and snap or at least be damaged. This approach can work temporarily when there is not a great load on the ropes, but use it with caution!
Anyone attending a Dayskipper practical course or above should be able to tie any of these knots before they arrive at the boat. There is enough to learn during the week without spending time learning these basic skills! The RYA Knots, Splices and Ropework Handbook covers the basics and the Ashley Book of Knots is the last word in knot tying for the connoisseur.
Sailtrain.co.uk is free to use, but if you feel you would like to contribute to the running and development costs you can donate via Paypal:
Additional Resources:
